
Customer Project
Outdoor Shower Bench
Browse Projects
-
Spray Painted Outdoor Planters
-
Outdoor Table
-
Estimated Time
6-8 Hours
-
Challenge Level
Advanced
-
Tools & Supplies:
-
26' x 3 1/2" x 1" Piece of Mold-Resistant Hardwood, Such as Sapele, Mahogany or Ipe
-
Sandpaper: grits 80, 120, 180
-
Waterproof Glue
-
1 1/2"-Long Stainless or Epoxy-Coated Deck Screws
-
Carpenter's Square
-
Miter saw
-
Rip Saw
-
Wood Clamps
-
Pencil
-
Tape Measure
-
Drill
-
Drill Bit With Counter-Sink Attachment to Match Screw Head
-
Wood Dowels for Plugs
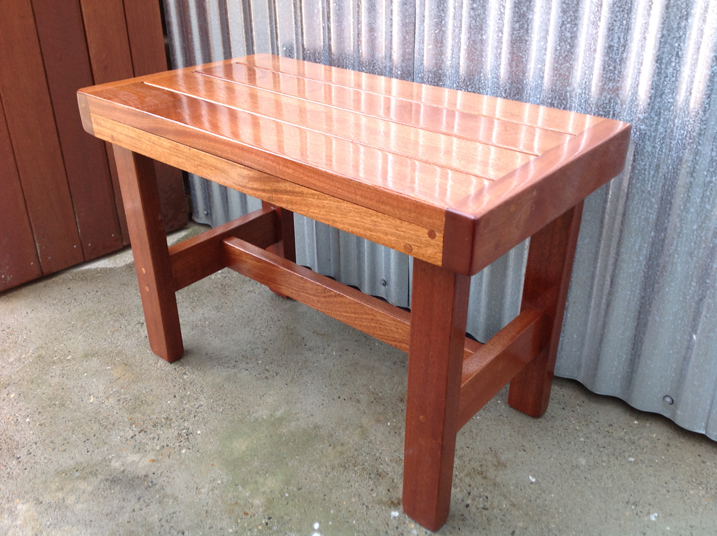
The final dimensions of this project can be changed to suit a particular installation or shower. These final dimensions may vary based on the dimensions of your shower stall size, and can be used as general guidelines for proportions. 18" high is a good standard for shower stools.
- Cut four pieces for the top @ 24" long.
- Cut two end pieces @ 14" long.
- Rip two pieces @ 24" x 1 3/4" for the side skirts.
- Rip four pieces @ 18" x 2" for the legs.
- Rip two pieces @ 14 " x 2" for the leg braces.
- Rip one piece @ 21" x 2" for the center stretcher.
- Pre-sand the pieces using progressively finer grit paper up to 180. Smooth edges and corners, especially the ends of the legs and edges of the top.
- Lay out the end pieces perpendicular to the four top pieces, allowing for equal space between each, and aligning the edges of the top pieces with the end pieces. Scraps of wood or nails are ideal for maintaining the space between the top pieces at this stage.
- Using clamps to hold the top and end pieces together, pre-drill and countersink for two screws, attaching the end pieces to the end grain of the top.
- Apply glue and screws to the top assembly.
- Fit the 24" x 1 3/4" side skirts and pre-drill, as with the prior steps. Glue and screw on both the edges and end to secure and lock the assembly together.
- Pre-drill the four legs, facing them along the inner side of the side skirts. Glue and fasten.
- Fit the leg stretchers between the legs, approximately 6" up; pre-drill, glue and fasten as per prior steps.
- Fit the center stretcher, centering on each leg stretcher. Pre-drill and glue from the outside of the leg stretchers into the end grain of the center stretcher.
- Plug all holes using glue and dowels. Cut and sand them flush when dry.
- Sand with 180-grit paper to remove excess glue.
- Stain, let stain dry and then spray on urethane for protection against the elements.